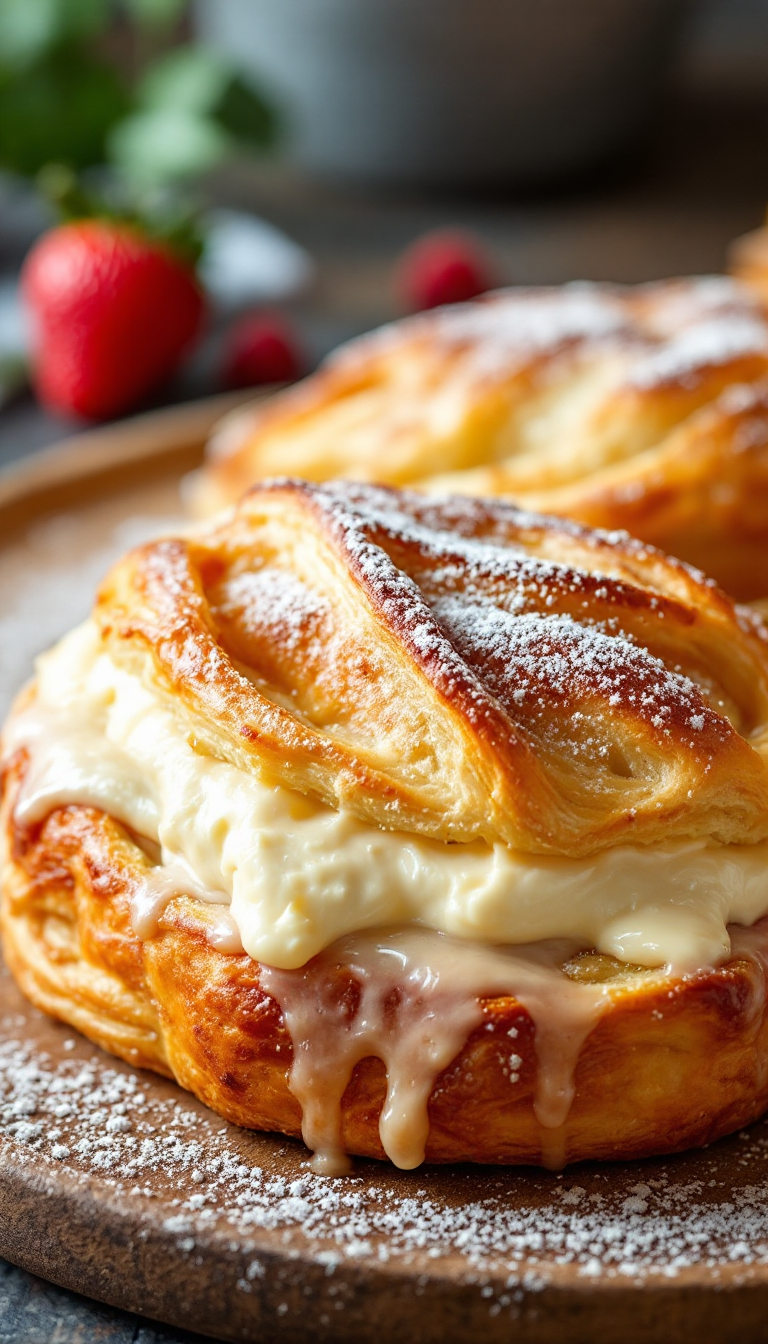
There’s just something about a flaky pastry that makes mornings feel extra special, like a gentle hug from a loved one—perhaps it’s the buttery layers or the sweet, creamy filling that leaves a trace of a smile with each bite. I first stumbled upon this cream cheese Danish recipe during a time when my mornings were rushed and chaotic, and it quickly became my go-to. It’s like a sweet escape in the chaos of life, as if each bite is whispering, “Slow down, just for a moment.
Steps
- Preheat your oven to 190°C (370°F) and prepare two baking sheets with parchment paper. If using puff pastry, adhere to the baking instructions provided on the packaging.
- In a mixing bowl, combine cream cheese, powdered sugar, lemon zest, and vanilla extract. Whisk these ingredients together until smooth.
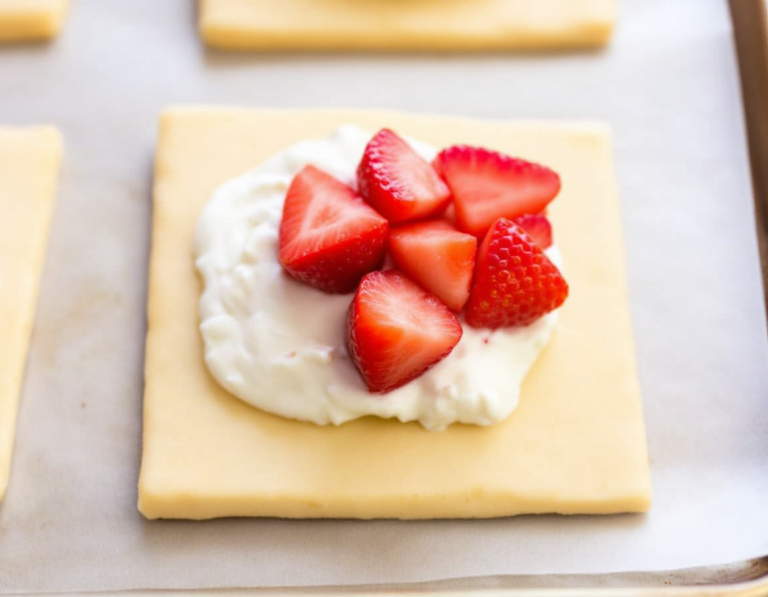
- Cut the pastry sheet into twelve squares, each measuring 3 inches by 3 inches (8 cm by 8 cm). Using a fork, prick the center of each square several times.
- Place approximately one tablespoon of the cream cheese mixture in the center of each square.
- Top the cream cheese filling with cubed strawberries, using 3-4 pieces per square.
- If using homemade Danish pastry, cover the assembled squares with plastic wrap and let them proof at room temperature for 20-40 minutes until they appear puffy. If using puff pastry, proceed to baking immediately.
- Mix egg yolk and milk to create an egg wash, then brush it onto the exposed pastry corners. Bake each sheet for 16-18 minutes until the pastries are golden brown and puffed.
Ingredients
- 1 batch Danish pastry or one 9″x 14″ (23cm by 36cm) sheet of store-bought puff pastry
- 150 g cream cheese, cold
- 40 g powdered sugar
- Zest of one lemon
- 1 teaspoon vanilla extract
- 150 g fresh strawberries (optional, or use any berries you prefer)
- 1 egg yolk
- 1 tablespoon milk
FAQ
- How should I store cream cheese Danishes?
- Cream cheese Danishes are best enjoyed warm right out of the oven. However, you can keep them in paper bags at room temperature for up to two days.
- Is it possible to freeze cream cheese Danishes?
- Yes, you can freeze them for up to two months. However, keep in mind that the texture of thawed pastries won’t match the freshness of newly baked ones. To freeze, cut the Danish pastry dough into squares, flash freeze them, then place them in a Ziplock bag separated by parchment paper. When ready to use, thaw in the fridge until softened, then assemble, proof, and bake.
- Can I substitute crescent roll dough for Danish pastry?
- Yes, crescent roll dough is actually a convenient option for making simple Danishes.
- What kind of berries can I use in this recipe?
- You can use any type of berries you prefer or even omit them for a plain cream cheese Danish. Strawberries, blueberries, blackberries, and raspberries all pair well with the cream cheese filling.
- Do I need to proof the Danish if using puff pastry?
- No, if using store-bought puff pastry, you don’t need to proof it before baking since it doesn’t contain yeast. Just let the pastry roll soften slightly before cutting, assembling, and baking.
Tips
- Proofing Tips: If you’re using homemade Danish pastry, allow the assembled pastries to proof at room temperature until they appear puffy and tender. In warmer kitchens, consider refrigerating one batch while another proofs to prevent over-proofing.
- Handling Puff Pastry: When working with frozen puff pastry, avoid proofing before baking as it contains no yeast. Instead, let the pastry soften at room temperature for about 10 minutes after unrolling to prevent breaking, then proceed with cutting and assembling.
- Flavor Enhancement: Incorporate fresh lemon zest into the cream cheese filling for an added burst of flavor that complements any berry choice. A dash of fresh lemon juice can further enhance the taste.
- Storage and Freezing: For the best taste, enjoy the Danishes fresh out of the oven. If storing, keep them in paper bags at room temperature for up to two days. To freeze, flash-freeze cut pastry squares, then store them in a Ziplock bag separated by parchment paper. Thaw in the fridge before assembling and baking.
Equipment
- Parchment Paper
- Pizza Cutter or a Long Sharp Knife
- Pastry Brush